[av_one_full first min_height=” vertical_alignment=’av-align-top’ space=” row_boxshadow=” row_boxshadow_color=” row_boxshadow_width=’10’ custom_margin=” margin=’0px’ mobile_breaking=” mobile_column_order=” min_col_height=” padding=” svg_div_top=” svg_div_top_color=’#333333′ svg_div_top_width=’100′ svg_div_top_height=’50’ svg_div_top_max_height=’none’ svg_div_top_flip=” svg_div_top_invert=” svg_div_top_front=” svg_div_top_opacity=” svg_div_top_preview=” svg_div_bottom=” svg_div_bottom_color=’#333333′ svg_div_bottom_width=’100′ svg_div_bottom_height=’50’ svg_div_bottom_max_height=’none’ svg_div_bottom_flip=” svg_div_bottom_invert=” svg_div_bottom_front=” svg_div_bottom_opacity=” svg_div_bottom_preview=” border=” border_style=’solid’ border_color=” radius=” column_boxshadow=” column_boxshadow_color=” column_boxshadow_width=’10’ background=’bg_color’ background_color=” background_gradient_direction=’vertical’ background_gradient_color1=’#000000′ background_gradient_color2=’#ffffff’ background_gradient_color3=” src=” background_position=’top left’ background_repeat=’no-repeat’ highlight=” highlight_size=” animation=” link=” linktarget=” link_hover=” title_attr=” alt_attr=” mobile_display=” mobile_col_pos=’0′ id=” custom_class=” template_class=” aria_label=” av_uid=’av-pbh62b’ sc_version=’1.0′]
[av_heading heading=’How to producing a baseball cap?’ tag=’h2′ style=’blockquote modern-quote modern-centered’ subheading_active=” show_icon=” icon=’ue800′ font=’entypo-fontello’ size=” av-medium-font-size-title=” av-small-font-size-title=” av-mini-font-size-title=” subheading_size=” av-medium-font-size=” av-small-font-size=” av-mini-font-size=” icon_size=” av-medium-font-size-1=” av-small-font-size-1=” av-mini-font-size-1=” color=” custom_font=” subheading_color=” seperator_color=” icon_color=” margin=” margin_sync=’true’ padding=’10’ icon_padding=’10’ headline_padding=” headline_padding_sync=’true’ link=” link_target=” id=” custom_class=” template_class=” element_template=” one_element_template=” av_uid=’av-l3wp9myf’ sc_version=’1.0′ admin_preview_bg=”][/av_heading]
[/av_one_full][av_textblock textblock_styling_align=” textblock_styling=” textblock_styling_gap=” textblock_styling_mobile=” size=” av-medium-font-size=” av-small-font-size=” av-mini-font-size=” font_color=” color=” id=” custom_class=” template_class=” av_uid=’av-l3wpa30u’ sc_version=’1.0′ admin_preview_bg=”]
Nowadays, Caps have been one of the most important fashion accessories for our daily dressing. With various different styles in caps both for men and women, there is no doubt that the baseball caps or snapback caps have been the most popular choice. It is a iconic cap of all time which can be worn by both men and women. And today, we will talk about the process of manufacturing a baseball cap.
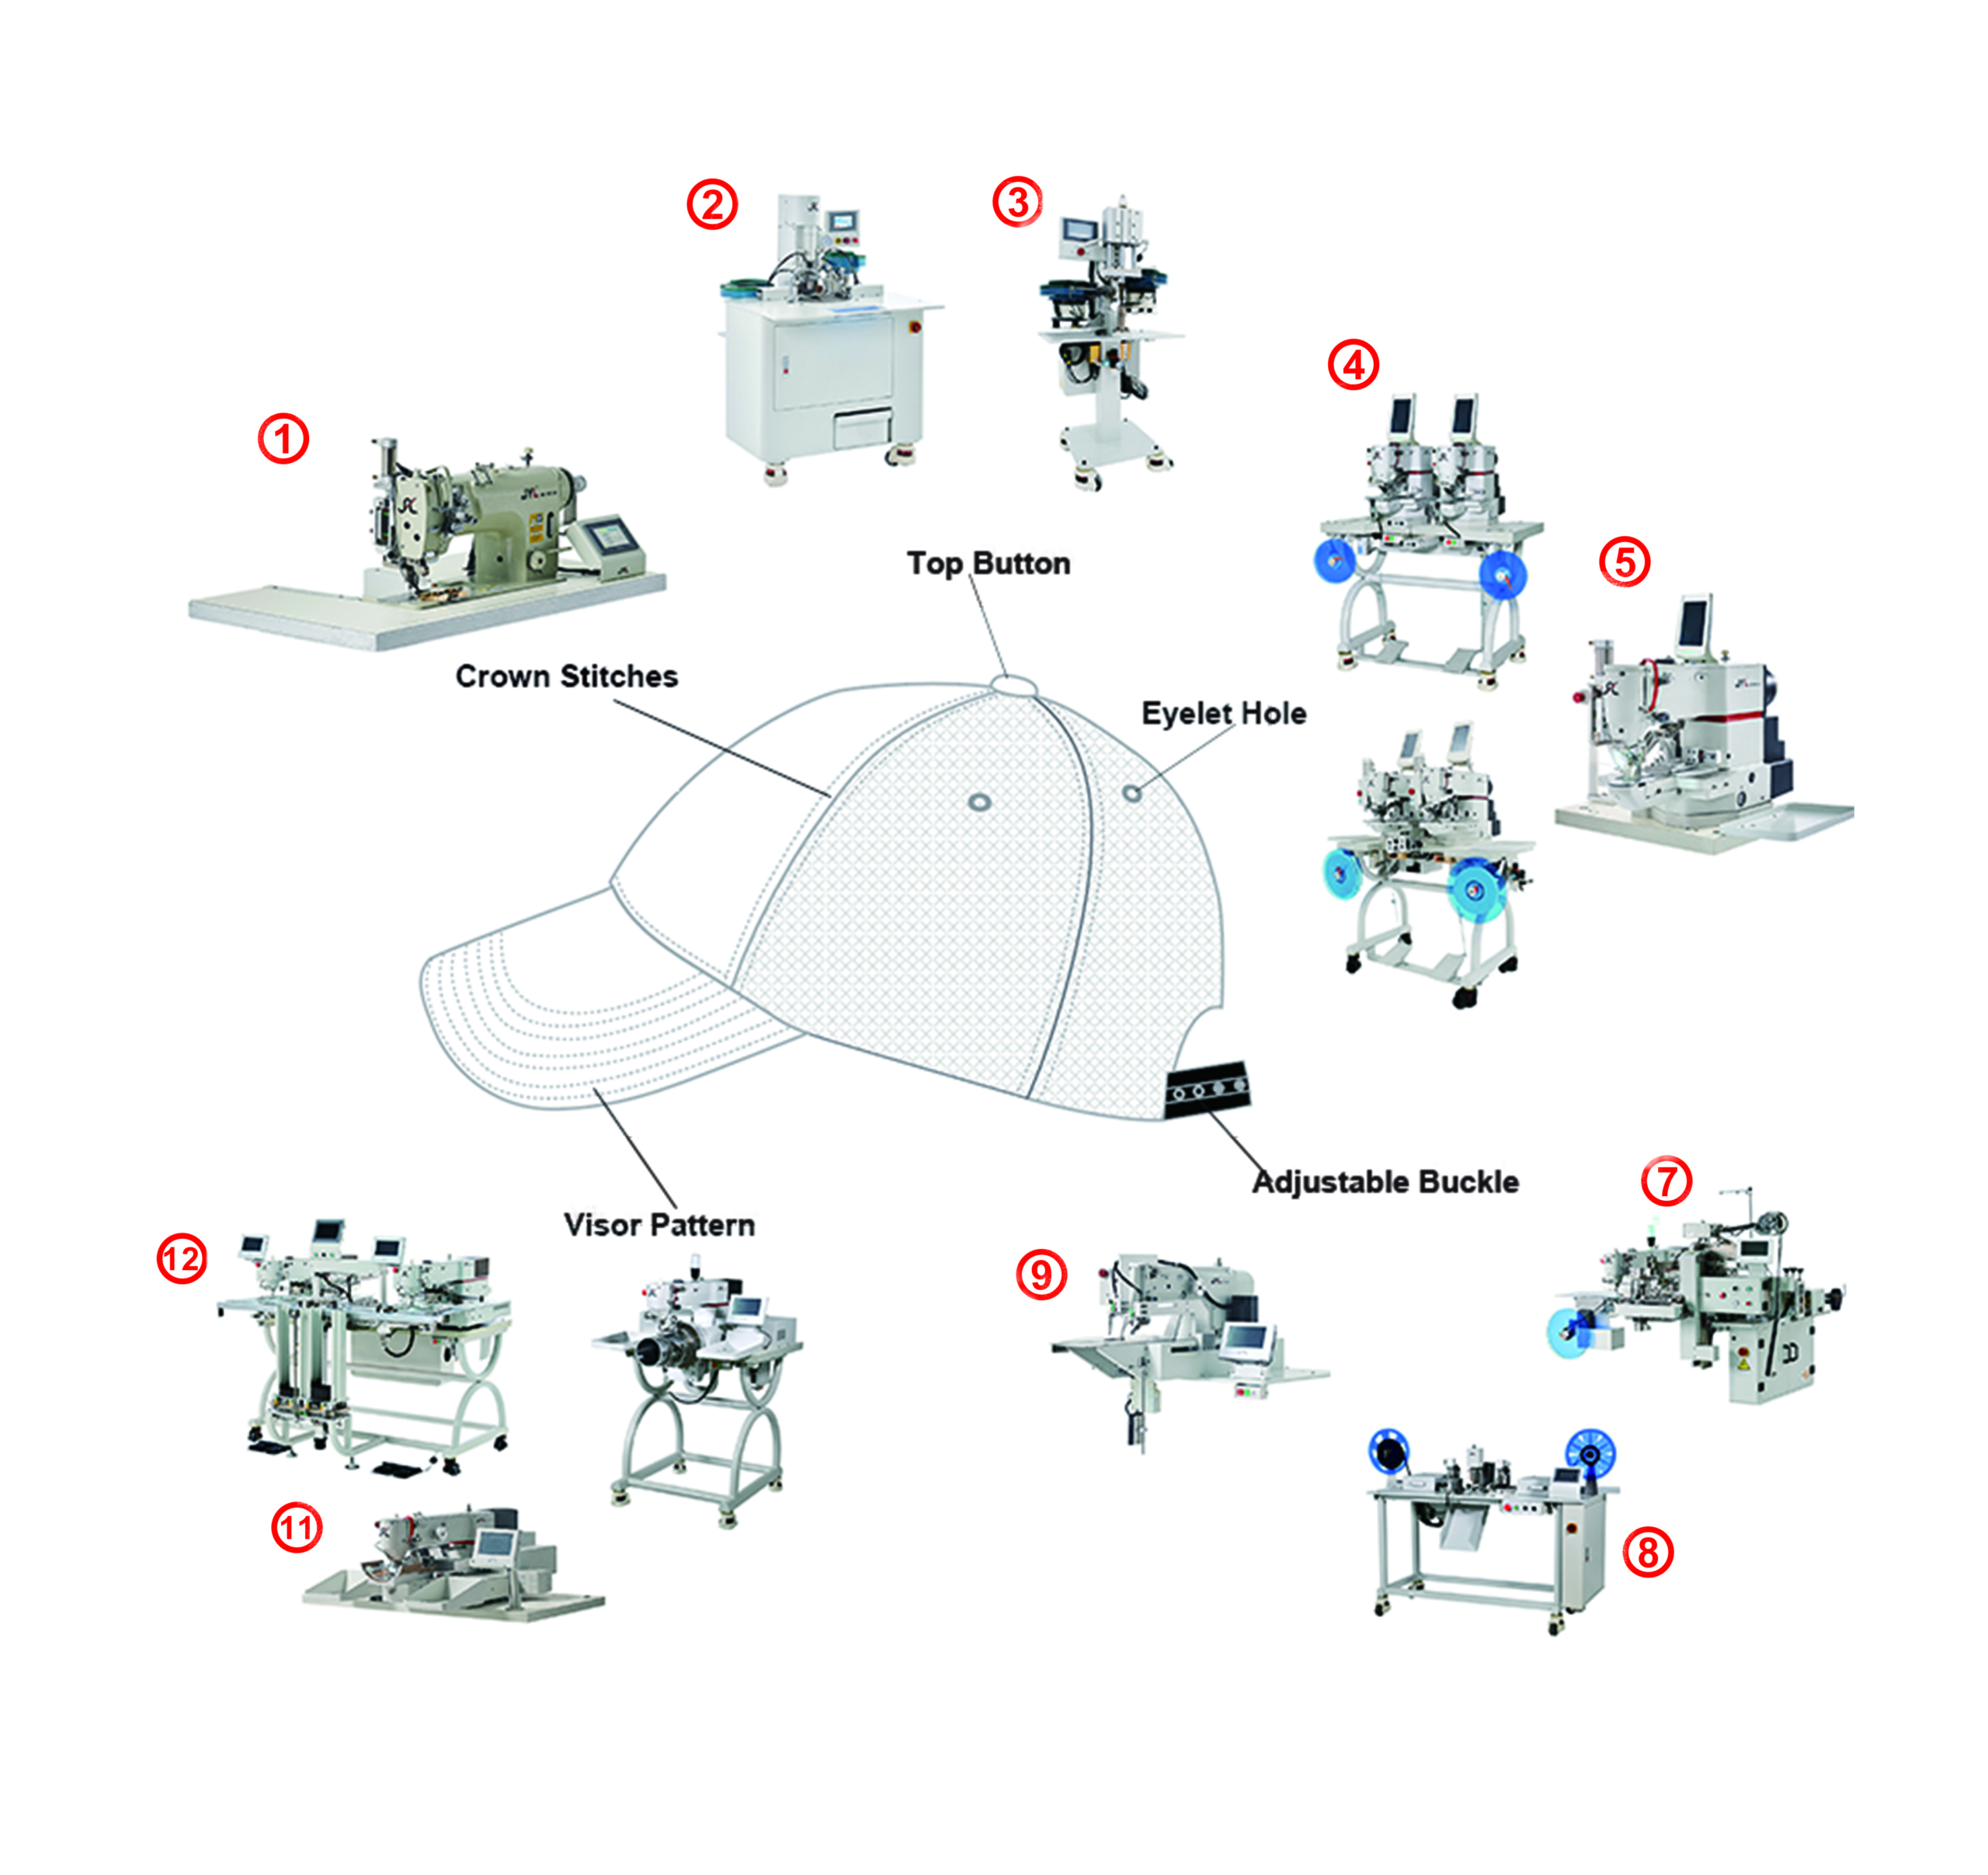
When it comes to cap making, the first important thing is know about the structure of the baseball cap. One baseball caps is made of 4 main components , they are cap Crown, cap Visor, Cap Top button and cap Closure.
Let’s know more details about these 4 components of cap before we start the process of making the baseball caps:
[/av_textblock]
[av_one_full first min_height=” vertical_alignment=’av-align-top’ space=” row_boxshadow=” row_boxshadow_color=” row_boxshadow_width=’10’ custom_margin=” margin=’0px’ mobile_breaking=” mobile_column_order=” min_col_height=” padding=” svg_div_top=” svg_div_top_color=’#333333′ svg_div_top_width=’100′ svg_div_top_height=’50’ svg_div_top_max_height=’none’ svg_div_top_flip=” svg_div_top_invert=” svg_div_top_front=” svg_div_top_opacity=” svg_div_top_preview=” svg_div_bottom=” svg_div_bottom_color=’#333333′ svg_div_bottom_width=’100′ svg_div_bottom_height=’50’ svg_div_bottom_max_height=’none’ svg_div_bottom_flip=” svg_div_bottom_invert=” svg_div_bottom_front=” svg_div_bottom_opacity=” svg_div_bottom_preview=” border=” border_style=’solid’ border_color=” radius=” column_boxshadow=” column_boxshadow_color=” column_boxshadow_width=’10’ background=’bg_color’ background_color=” background_gradient_direction=’vertical’ background_gradient_color1=’#000000′ background_gradient_color2=’#ffffff’ background_gradient_color3=” src=” background_position=’top left’ background_repeat=’no-repeat’ highlight=” highlight_size=” animation=” link=” linktarget=” link_hover=” title_attr=” alt_attr=” mobile_display=” mobile_col_pos=’0′ id=” custom_class=” template_class=” aria_label=” av_uid=’av-nt67z7′ sc_version=’1.0′]
[av_image src=’https://jylmachine.com/wp-content/uploads/2022/05/cap-sewing-machine-1-300×120.png’ attachment=’534′ attachment_size=’medium’ copyright=” caption=” image_size=’entry_without_sidebar’ styling=” align=’center’ font_size=” overlay_opacity=’0.4′ overlay_color=’#000000′ overlay_text_color=’#ffffff’ animation=’no-animation’ hover=” appearance=” link=” target=” title_attr=” alt_attr=” img_scrset=” lazy_loading=’disabled’ id=” custom_class=” template_class=” av_element_hidden_in_editor=’0′ av_uid=’av-l3wpc8n4′ sc_version=’1.0′ admin_preview_bg=”][/av_image]
[av_textblock textblock_styling_align=” textblock_styling=” textblock_styling_gap=” textblock_styling_mobile=” size=” av-medium-font-size=” av-small-font-size=” av-mini-font-size=” font_color=” color=” id=” custom_class=” template_class=” element_template=” one_element_template=” av_uid=’av-l3wpduzf’ sc_version=’1.0′ admin_preview_bg=”]
Cap Crown: The dome part of the cap is called cap, and it is made of 6 patchwork sewed triangular fabric panels together.
Cap Visor: This is a hard fabric which is sandwiched with plastic and cardboard. And it is attached to the front of the cap crown, which helps to shield the eyes from the sunlight. It usually made in a little bit of different shape and can infect the entire look of the baseball cap.
Top button: it is a metal button covered with fabric. And it’s attached at the top of the cap which is used for fastening all 6 pieces of patchwork panels together.
Cap Closure: It is a brick-shaped piece on the back of cap, which is used for adjusting the suitable size for fitting the head . And there are different types of cap closure, likes knapsacks, plastic hooks and buckles.
[/av_textblock]
[/av_one_full][av_one_full first min_height=” vertical_alignment=’av-align-top’ space=” row_boxshadow=” row_boxshadow_color=” row_boxshadow_width=’10’ custom_margin=” margin=’0px’ mobile_breaking=” mobile_column_order=” min_col_height=” padding=” svg_div_top=” svg_div_top_color=’#333333′ svg_div_top_width=’100′ svg_div_top_height=’50’ svg_div_top_max_height=’none’ svg_div_top_flip=” svg_div_top_invert=” svg_div_top_front=” svg_div_top_opacity=” svg_div_top_preview=” svg_div_bottom=” svg_div_bottom_color=’#333333′ svg_div_bottom_width=’100′ svg_div_bottom_height=’50’ svg_div_bottom_max_height=’none’ svg_div_bottom_flip=” svg_div_bottom_invert=” svg_div_bottom_front=” svg_div_bottom_opacity=” svg_div_bottom_preview=” border=” border_style=’solid’ border_color=” radius=” column_boxshadow=” column_boxshadow_color=” column_boxshadow_width=’10’ background=’bg_color’ background_color=” background_gradient_direction=’vertical’ background_gradient_color1=’#000000′ background_gradient_color2=’#ffffff’ background_gradient_color3=” src=” background_position=’top left’ background_repeat=’no-repeat’ highlight=” highlight_size=” animation=” link=” linktarget=” link_hover=” title_attr=” alt_attr=” mobile_display=” mobile_col_pos=’0′ id=” custom_class=” template_class=” aria_label=” av_uid=’av-locg2r’ sc_version=’1.0′]
[av_heading heading=’How to making a baseball caps? And there are totally 11 steps of Baseball cap manufacturing process.’ tag=’h3′ style=’blockquote modern-quote modern-centered’ subheading_active=” show_icon=” icon=’ue800′ font=’entypo-fontello’ size=” av-medium-font-size-title=” av-small-font-size-title=” av-mini-font-size-title=” subheading_size=” av-medium-font-size=” av-small-font-size=” av-mini-font-size=” icon_size=” av-medium-font-size-1=” av-small-font-size-1=” av-mini-font-size-1=” color=” custom_font=” subheading_color=” seperator_color=” icon_color=” margin=” margin_sync=’true’ padding=’10’ icon_padding=’10’ headline_padding=” headline_padding_sync=’true’ link=” link_target=” id=” custom_class=” template_class=” element_template=” one_element_template=” av_uid=’av-l3wrdgye’ sc_version=’1.0′ admin_preview_bg=”][/av_heading]
[av_image src=’https://jylmachine.com/wp-content/uploads/2022/05/横幅2-1-300×64.jpg’ attachment=’940′ attachment_size=’medium’ copyright=” caption=” image_size=’no scaling’ styling=” align=’center’ font_size=” overlay_opacity=’0.4′ overlay_color=’#000000′ overlay_text_color=’#ffffff’ animation=’no-animation’ hover=” appearance=” link=’manually,https://jylmachine.com/product/’ target=’_blank’ title_attr=” alt_attr=” img_scrset=” lazy_loading=’disabled’ id=” custom_class=” template_class=” av_element_hidden_in_editor=’0′ av_uid=’av-l3wss9m8′ sc_version=’1.0′ admin_preview_bg=”][/av_image]
[av_textblock textblock_styling_align=” textblock_styling=” textblock_styling_gap=” textblock_styling_mobile=” size=” av-medium-font-size=” av-small-font-size=” av-mini-font-size=” font_color=” color=” id=” custom_class=” template_class=” element_template=” one_element_template=” av_uid=’av-l3wrdx8p’ sc_version=’1.0′ admin_preview_bg=”]
1. The first stage of manufacturing starts with the cutting of fabric.
All these 6 pieces’ fabric are the same shape and size used for most of the caps, so the fabric panels will be cut by automatic cutting machines. Because the automatic cutting machine are able to ensure the stable quality for the the panes and visors and save some time and labor for cutting panels.
[/av_textblock]
[/av_one_full][av_one_full first min_height=” vertical_alignment=’av-align-top’ space=” row_boxshadow=” row_boxshadow_color=” row_boxshadow_width=’10’ custom_margin=” margin=’0px’ mobile_breaking=” mobile_column_order=” min_col_height=” padding=” svg_div_top=” svg_div_top_color=’#333333′ svg_div_top_width=’100′ svg_div_top_height=’50’ svg_div_top_max_height=’none’ svg_div_top_flip=” svg_div_top_invert=” svg_div_top_front=” svg_div_top_opacity=” svg_div_top_preview=” svg_div_bottom=” svg_div_bottom_color=’#333333′ svg_div_bottom_width=’100′ svg_div_bottom_height=’50’ svg_div_bottom_max_height=’none’ svg_div_bottom_flip=” svg_div_bottom_invert=” svg_div_bottom_front=” svg_div_bottom_opacity=” svg_div_bottom_preview=” border=” border_style=’solid’ border_color=” radius=” column_boxshadow=” column_boxshadow_color=” column_boxshadow_width=’10’ background=’bg_color’ background_color=” background_gradient_direction=’vertical’ background_gradient_color1=’#000000′ background_gradient_color2=’#ffffff’ background_gradient_color3=” src=” background_position=’top left’ background_repeat=’no-repeat’ highlight=” highlight_size=” animation=” link=” linktarget=” link_hover=” title_attr=” alt_attr=” mobile_display=” mobile_col_pos=’0′ id=” custom_class=” template_class=” aria_label=” av_uid=’av-208jqr’ sc_version=’1.0′]
[av_image src=’https://jylmachine.com/wp-content/uploads/2022/05/JYL-SZPF-01-TWO-needle-patchwork-sewing-machine-6-300×300.jpg’ attachment=’1134′ attachment_size=’medium’ copyright=” caption=” image_size=” styling=” align=’center’ font_size=” overlay_opacity=’0.4′ overlay_color=’#000000′ overlay_text_color=’#ffffff’ animation=’no-animation’ hover=” appearance=” link=’manually,https://jylmachine.com/product/automatic-patchwork-sewing-machine/’ target=’_blank’ title_attr=” alt_attr=” img_scrset=” lazy_loading=’disabled’ id=” custom_class=” template_class=” av_element_hidden_in_editor=’0′ av_uid=’av-l3wrx6zw’ sc_version=’1.0′ admin_preview_bg=”][/av_image]
[av_textblock textblock_styling_align=” textblock_styling=” textblock_styling_gap=” textblock_styling_mobile=” size=” av-medium-font-size=” av-small-font-size=” av-mini-font-size=” font_color=” color=” id=” custom_class=” template_class=” element_template=” one_element_template=” av_uid=’av-l3wrmaru’ sc_version=’1.0′ admin_preview_bg=”]
2. The second step is patchwork sewing the 6 pieces’ fabric panel for the cap crown.
The stitching starts with the 6 pieces’ panels first through double needle sewing and cutting machine. And it will shaped in to a crown. And patchwork stitching the separate cap crown with cap visor together. Often due to cap design, another layer of fusing fabric is added to the back of the front panel. This gives the raised shape to the crown.
[/av_textblock]
[/av_one_full][av_one_full first min_height=” vertical_alignment=’av-align-top’ space=” row_boxshadow=” row_boxshadow_color=” row_boxshadow_width=’10’ custom_margin=” margin=’0px’ mobile_breaking=” mobile_column_order=” min_col_height=” padding=” svg_div_top=” svg_div_top_color=’#333333′ svg_div_top_width=’100′ svg_div_top_height=’50’ svg_div_top_max_height=’none’ svg_div_top_flip=” svg_div_top_invert=” svg_div_top_front=” svg_div_top_opacity=” svg_div_top_preview=” svg_div_bottom=” svg_div_bottom_color=’#333333′ svg_div_bottom_width=’100′ svg_div_bottom_height=’50’ svg_div_bottom_max_height=’none’ svg_div_bottom_flip=” svg_div_bottom_invert=” svg_div_bottom_front=” svg_div_bottom_opacity=” svg_div_bottom_preview=” border=” border_style=’solid’ border_color=” radius=” column_boxshadow=” column_boxshadow_color=” column_boxshadow_width=’10’ background=’bg_color’ background_color=” background_gradient_direction=’vertical’ background_gradient_color1=’#000000′ background_gradient_color2=’#ffffff’ background_gradient_color3=” src=” background_position=’top left’ background_repeat=’no-repeat’ highlight=” highlight_size=” animation=” link=” linktarget=” link_hover=” title_attr=” alt_attr=” mobile_display=” mobile_col_pos=’0′ id=” custom_class=” template_class=” aria_label=” av_uid=’av-jc23yr’ sc_version=’1.0′]
[av_image src=’https://jylmachine.com/wp-content/uploads/2022/06/Best-Embroidery-Machine-For-Hats-JYLmachine.com_-300×167.jpg’ attachment=’1242′ attachment_size=’medium’ copyright=” caption=’yes’ image_size=’magazine’ styling=” align=’center’ font_size=” overlay_opacity=’0.4′ overlay_color=’#000000′ overlay_text_color=’#ffffff’ animation=’no-animation’ hover=” appearance=” link=’manually,https://sewingmachinebuffs.com/best-embroidery-machine-for-hats/’ target=’_blank’ title_attr=” alt_attr=” img_scrset=” lazy_loading=’disabled’ id=” custom_class=” template_class=” av_element_hidden_in_editor=’0′ av_uid=’av-l3ws8nt7′ sc_version=’1.0′ admin_preview_bg=”]
Picture from sewingmachinebuffs.com
[/av_image]
[av_textblock textblock_styling_align=” textblock_styling=” textblock_styling_gap=” textblock_styling_mobile=” size=” av-medium-font-size=” av-small-font-size=” av-mini-font-size=” font_color=” color=” id=” custom_class=” template_class=” element_template=” one_element_template=” av_uid=’av-l3wrmoow’ sc_version=’1.0′ admin_preview_bg=”]
3. Embroidery logo on the panels:
After crown panel patchwork sewing, the front panel is need to be embroidered logos. They will be sent to the embroidery department, and its distinct logos and graphics are embroidered onto the front panels through computerized embroidery machines.
[/av_textblock]
[/av_one_full][av_one_full first min_height=” vertical_alignment=’av-align-top’ space=” row_boxshadow=” row_boxshadow_color=” row_boxshadow_width=’10’ custom_margin=” margin=’0px’ mobile_breaking=” mobile_column_order=” min_col_height=” padding=” svg_div_top=” svg_div_top_color=’#333333′ svg_div_top_width=’100′ svg_div_top_height=’50’ svg_div_top_max_height=’none’ svg_div_top_flip=” svg_div_top_invert=” svg_div_top_front=” svg_div_top_opacity=” svg_div_top_preview=” svg_div_bottom=” svg_div_bottom_color=’#333333′ svg_div_bottom_width=’100′ svg_div_bottom_height=’50’ svg_div_bottom_max_height=’none’ svg_div_bottom_flip=” svg_div_bottom_invert=” svg_div_bottom_front=” svg_div_bottom_opacity=” svg_div_bottom_preview=” border=” border_style=’solid’ border_color=” radius=” column_boxshadow=” column_boxshadow_color=” column_boxshadow_width=’10’ background=’bg_color’ background_color=” background_gradient_direction=’vertical’ background_gradient_color1=’#000000′ background_gradient_color2=’#ffffff’ background_gradient_color3=” src=” background_position=’top left’ background_repeat=’no-repeat’ highlight=” highlight_size=” animation=” link=” linktarget=” link_hover=” title_attr=” alt_attr=” mobile_display=” mobile_col_pos=’0′ id=” custom_class=” template_class=” aria_label=” av_uid=’av-hc7ioj’ sc_version=’1.0′]
[av_image src=’https://jylmachine.com/wp-content/uploads/2022/05/JYL-B430-XY-eyelet-sewing-machine-2-300×300.jpg’ attachment=’1055′ attachment_size=’medium’ copyright=” caption=” image_size=” styling=” align=’center’ font_size=” overlay_opacity=’0.4′ overlay_color=’#000000′ overlay_text_color=’#ffffff’ animation=’no-animation’ hover=” appearance=” link=’manually,https://jylmachine.com/product/automatic-eyelet-sewing-machine/’ target=’_blank’ title_attr=” alt_attr=” img_scrset=” lazy_loading=’disabled’ id=” custom_class=” template_class=” av_element_hidden_in_editor=’0′ av_uid=’av-l3wsay1v’ sc_version=’1.0′ admin_preview_bg=”][/av_image]
[av_textblock textblock_styling_align=” textblock_styling=” textblock_styling_gap=” textblock_styling_mobile=” size=” av-medium-font-size=” av-small-font-size=” av-mini-font-size=” font_color=” color=” id=” custom_class=” template_class=” element_template=” one_element_template=” av_uid=’av-l3wrmwsy’ sc_version=’1.0′ admin_preview_bg=”]
4. Attaching eyelets on the panels:
After embroidery process, the panels need to be punched to have a hole, then a automatic eyelet sewing machine will pierces through the panel and stitch around its edges. The holes will be sewn into beautiful eyelets. Not all the panels are pierced but at least two needs to be there so that proper air circulation happen which could vent out the heat building under the cap.
[/av_textblock]
[/av_one_full][av_one_full first min_height=” vertical_alignment=’av-align-top’ space=” row_boxshadow=” row_boxshadow_color=” row_boxshadow_width=’10’ custom_margin=” margin=’0px’ mobile_breaking=” mobile_column_order=” min_col_height=” padding=” svg_div_top=” svg_div_top_color=’#333333′ svg_div_top_width=’100′ svg_div_top_height=’50’ svg_div_top_max_height=’none’ svg_div_top_flip=” svg_div_top_invert=” svg_div_top_front=” svg_div_top_opacity=” svg_div_top_preview=” svg_div_bottom=” svg_div_bottom_color=’#333333′ svg_div_bottom_width=’100′ svg_div_bottom_height=’50’ svg_div_bottom_max_height=’none’ svg_div_bottom_flip=” svg_div_bottom_invert=” svg_div_bottom_front=” svg_div_bottom_opacity=” svg_div_bottom_preview=” border=” border_style=’solid’ border_color=” radius=” column_boxshadow=” column_boxshadow_color=” column_boxshadow_width=’10’ background=’bg_color’ background_color=” background_gradient_direction=’vertical’ background_gradient_color1=’#000000′ background_gradient_color2=’#ffffff’ background_gradient_color3=” src=” background_position=’top left’ background_repeat=’no-repeat’ highlight=” highlight_size=” animation=” link=” linktarget=” link_hover=” title_attr=” alt_attr=” mobile_display=” mobile_col_pos=’0′ id=” custom_class=” template_class=” aria_label=” av_uid=’av-fxc11f’ sc_version=’1.0′]
[av_image src=’https://jylmachine.com/wp-content/uploads/2022/06/JYL-B430-XY-eyelet-sewing-machine-7-300×300.jpg’ attachment=’1243′ attachment_size=’medium’ copyright=” caption=” image_size=” styling=” align=’center’ font_size=” overlay_opacity=’0.4′ overlay_color=’#000000′ overlay_text_color=’#ffffff’ animation=’no-animation’ hover=” appearance=” link=’manually,https://jylmachine.com/product/automatic-eyelet-sewing-machine/’ target=’_blank’ title_attr=” alt_attr=” img_scrset=” lazy_loading=’disabled’ id=” custom_class=” template_class=” av_element_hidden_in_editor=’0′ av_uid=’av-l3wsdvlb’ sc_version=’1.0′ admin_preview_bg=”][/av_image]
[av_textblock textblock_styling_align=” textblock_styling=” textblock_styling_gap=” textblock_styling_mobile=” size=” av-medium-font-size=” av-small-font-size=” av-mini-font-size=” font_color=” color=” id=” custom_class=” template_class=” element_template=” one_element_template=” av_uid=’av-l3wrn6of’ sc_version=’1.0′ admin_preview_bg=”]
5. Attach tapes:
With most of the caps being 6 paneled caps the stitching starts with stitching 3 panels together twice which is stitched in between and reversed to form the crown. After all the panels are stitched together fabric tapes are added onto the seams from the inside so that there are no exposed seam edges inside the cap. These tapes ensure that the seams give a soft feel to the wearer at the seams.
[/av_textblock]
[/av_one_full][av_one_full first min_height=” vertical_alignment=’av-align-top’ space=” row_boxshadow=” row_boxshadow_color=” row_boxshadow_width=’10’ custom_margin=” margin=’0px’ mobile_breaking=” mobile_column_order=” min_col_height=” padding=” svg_div_top=” svg_div_top_color=’#333333′ svg_div_top_width=’100′ svg_div_top_height=’50’ svg_div_top_max_height=’none’ svg_div_top_flip=” svg_div_top_invert=” svg_div_top_front=” svg_div_top_opacity=” svg_div_top_preview=” svg_div_bottom=” svg_div_bottom_color=’#333333′ svg_div_bottom_width=’100′ svg_div_bottom_height=’50’ svg_div_bottom_max_height=’none’ svg_div_bottom_flip=” svg_div_bottom_invert=” svg_div_bottom_front=” svg_div_bottom_opacity=” svg_div_bottom_preview=” border=” border_style=’solid’ border_color=” radius=” column_boxshadow=” column_boxshadow_color=” column_boxshadow_width=’10’ background=’bg_color’ background_color=” background_gradient_direction=’vertical’ background_gradient_color1=’#000000′ background_gradient_color2=’#ffffff’ background_gradient_color3=” src=” background_position=’top left’ background_repeat=’no-repeat’ highlight=” highlight_size=” animation=” link=” linktarget=” link_hover=” title_attr=” alt_attr=” mobile_display=” mobile_col_pos=’0′ id=” custom_class=” template_class=” aria_label=” av_uid=’av-dg35gj’ sc_version=’1.0′]
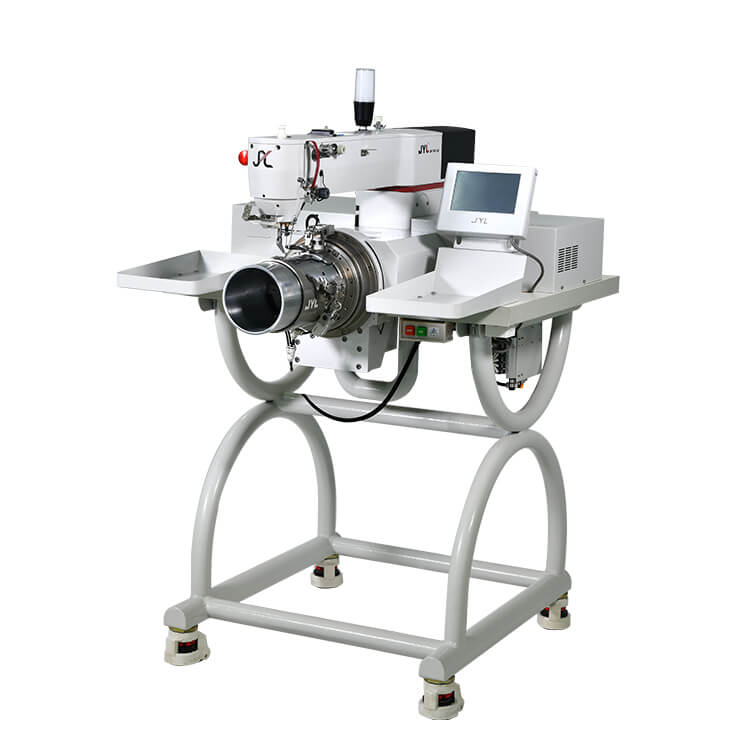
[av_image src=’https://jylmachine.com/wp-content/uploads/2022/05/JYL-M1510G-SWM-cap-tongue-sewing-machine-3-300×300.jpg’ attachment=’1017′ attachment_size=’medium’ copyright=” caption=” image_size=” styling=” align=’center’ font_size=” overlay_opacity=’0.4′ overlay_color=’#000000′ overlay_text_color=’#ffffff’ animation=’no-animation’ hover=” appearance=” link=’manually,https://jylmachine.com/product/baseball-cap-sewing-machine/’ target=’_blank’ title_attr=” alt_attr=” img_scrset=” lazy_loading=’disabled’ id=” custom_class=” template_class=” av_element_hidden_in_editor=’0′ av_uid=’av-l3wsq5wl’ sc_version=’1.0′ admin_preview_bg=”][/av_image]
[av_textblock textblock_styling_align=” textblock_styling=” textblock_styling_gap=” textblock_styling_mobile=” size=” av-medium-font-size=” av-small-font-size=” av-mini-font-size=” font_color=” color=” id=” custom_class=” template_class=” element_template=” one_element_template=” av_uid=’av-l3wrnh7e’ sc_version=’1.0′ admin_preview_bg=”]
6. Make the visor part:
Alongside the crown, the front visor is made by stitching two fabric panes like a pocket and turning it inside out. For a stiff visor often cardboard is inserted in between the fabrics and sealed from the hem. The material to be put inside the visor can range from stiff fabric to plastic sheet depending on the requirement. After this 7-8 parallel stitch is stitched on the visor parallel to the visor hem which ensures that the bottom fabric doesn’t lose its shape with time. This is mostly done through automatic stitching machines for the highest quality.
[/av_textblock]
[/av_one_full][av_one_full first min_height=” vertical_alignment=’av-align-top’ space=” row_boxshadow=” row_boxshadow_color=” row_boxshadow_width=’10’ custom_margin=” margin=’0px’ mobile_breaking=” mobile_column_order=” min_col_height=” padding=” svg_div_top=” svg_div_top_color=’#333333′ svg_div_top_width=’100′ svg_div_top_height=’50’ svg_div_top_max_height=’none’ svg_div_top_flip=” svg_div_top_invert=” svg_div_top_front=” svg_div_top_opacity=” svg_div_top_preview=” svg_div_bottom=” svg_div_bottom_color=’#333333′ svg_div_bottom_width=’100′ svg_div_bottom_height=’50’ svg_div_bottom_max_height=’none’ svg_div_bottom_flip=” svg_div_bottom_invert=” svg_div_bottom_front=” svg_div_bottom_opacity=” svg_div_bottom_preview=” border=” border_style=’solid’ border_color=” radius=” column_boxshadow=” column_boxshadow_color=” column_boxshadow_width=’10’ background=’bg_color’ background_color=” background_gradient_direction=’vertical’ background_gradient_color1=’#000000′ background_gradient_color2=’#ffffff’ background_gradient_color3=” src=” background_position=’top left’ background_repeat=’no-repeat’ highlight=” highlight_size=” animation=” link=” linktarget=” link_hover=” title_attr=” alt_attr=” mobile_display=” mobile_col_pos=’0′ id=” custom_class=” template_class=” aria_label=” av_uid=’av-cxfusj’ sc_version=’1.0′]
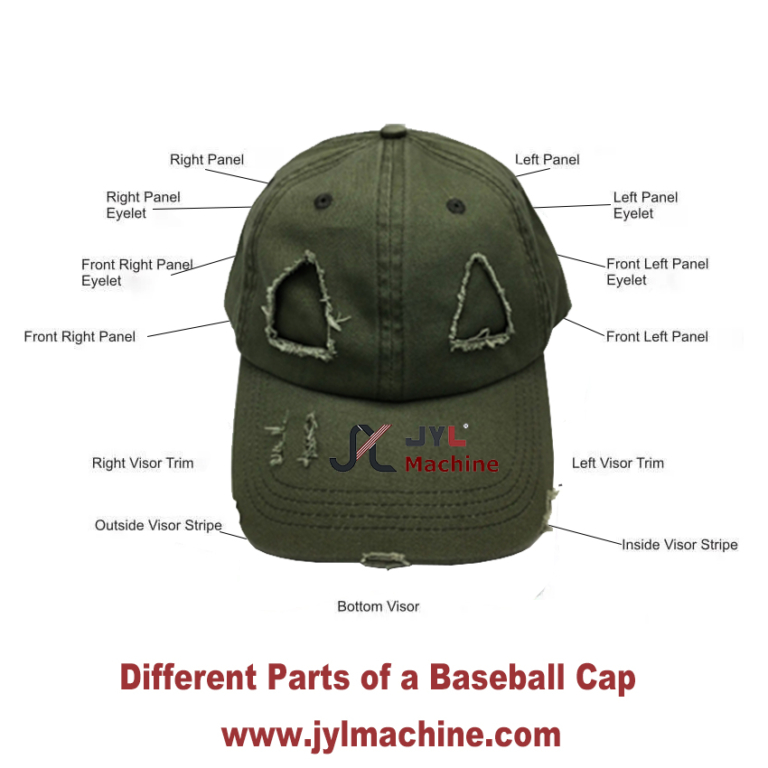
[av_image src=’https://jylmachine.com/wp-content/uploads/2022/06/Different-Parts-of-making-a-Baseball-Cap-300×300.jpg’ attachment=’1302′ attachment_size=’medium’ copyright=” caption=” image_size=’masonry’ styling=” align=’center’ font_size=” overlay_opacity=’0.4′ overlay_color=’#000000′ overlay_text_color=’#ffffff’ animation=’no-animation’ hover=” appearance=” link=” target=’_blank’ title_attr=” alt_attr=” img_scrset=” lazy_loading=’disabled’ id=” custom_class=” template_class=” av_element_hidden_in_editor=’0′ av_uid=’av-l3wsowxy’ sc_version=’1.0′ admin_preview_bg=”][/av_image]
[av_textblock textblock_styling_align=” textblock_styling=” textblock_styling_gap=” textblock_styling_mobile=” size=” av-medium-font-size=” av-small-font-size=” av-mini-font-size=” font_color=” color=” id=” custom_class=” template_class=” element_template=” one_element_template=” av_uid=’av-l3wrnpin’ sc_version=’1.0′ admin_preview_bg=”]
7. After that, the cap visor is attached and stitched with the crown together with normal single sewing machine.
[/av_textblock]
[/av_one_full][av_one_full first min_height=” vertical_alignment=’av-align-top’ space=” row_boxshadow=” row_boxshadow_color=” row_boxshadow_width=’10’ custom_margin=” margin=’0px’ mobile_breaking=” mobile_column_order=” min_col_height=” padding=” svg_div_top=” svg_div_top_color=’#333333′ svg_div_top_width=’100′ svg_div_top_height=’50’ svg_div_top_max_height=’none’ svg_div_top_flip=” svg_div_top_invert=” svg_div_top_front=” svg_div_top_opacity=” svg_div_top_preview=” svg_div_bottom=” svg_div_bottom_color=’#333333′ svg_div_bottom_width=’100′ svg_div_bottom_height=’50’ svg_div_bottom_max_height=’none’ svg_div_bottom_flip=” svg_div_bottom_invert=” svg_div_bottom_front=” svg_div_bottom_opacity=” svg_div_bottom_preview=” border=” border_style=’solid’ border_color=” radius=” column_boxshadow=” column_boxshadow_color=” column_boxshadow_width=’10’ background=’bg_color’ background_color=” background_gradient_direction=’vertical’ background_gradient_color1=’#000000′ background_gradient_color2=’#ffffff’ background_gradient_color3=” src=” background_position=’top left’ background_repeat=’no-repeat’ highlight=” highlight_size=” animation=” link=” linktarget=” link_hover=” title_attr=” alt_attr=” mobile_display=” mobile_col_pos=’0′ id=” custom_class=” template_class=” aria_label=” av_uid=’av-ag8oxv’ sc_version=’1.0′]
[av_image src=’https://jylmachine.com/wp-content/uploads/2022/05/automatic-hand-strapping-machine-300×300.jpg’ attachment=’1040′ attachment_size=’medium’ copyright=” caption=” image_size=” styling=” align=’center’ font_size=” overlay_opacity=’0.4′ overlay_color=’#000000′ overlay_text_color=’#ffffff’ animation=’no-animation’ hover=” appearance=” link=’manually,https://jylmachine.com/product/automatic-velcro-tape-sewing-machine/’ target=’_blank’ title_attr=” alt_attr=” img_scrset=” lazy_loading=’disabled’ id=” custom_class=” template_class=” av_element_hidden_in_editor=’0′ av_uid=’av-l3wsnnfp’ sc_version=’1.0′ admin_preview_bg=”][/av_image]
[av_textblock textblock_styling_align=” textblock_styling=” textblock_styling_gap=” textblock_styling_mobile=” size=” av-medium-font-size=” av-small-font-size=” av-mini-font-size=” font_color=” color=” id=” custom_class=” template_class=” element_template=” one_element_template=” av_uid=’av-l3wrnzlr’ sc_version=’1.0′ admin_preview_bg=”]
8. Attach cap sweatband:
after the cap visor attached, then stitch one piece of sweatband to the base of the hat crown. Besides, During the logo printed labels can be sewn on the sweatband.
[/av_textblock]
[/av_one_full][av_one_full first min_height=” vertical_alignment=’av-align-top’ space=” row_boxshadow=” row_boxshadow_color=” row_boxshadow_width=’10’ custom_margin=” margin=’0px’ mobile_breaking=” mobile_column_order=” min_col_height=” padding=” svg_div_top=” svg_div_top_color=’#333333′ svg_div_top_width=’100′ svg_div_top_height=’50’ svg_div_top_max_height=’none’ svg_div_top_flip=” svg_div_top_invert=” svg_div_top_front=” svg_div_top_opacity=” svg_div_top_preview=” svg_div_bottom=” svg_div_bottom_color=’#333333′ svg_div_bottom_width=’100′ svg_div_bottom_height=’50’ svg_div_bottom_max_height=’none’ svg_div_bottom_flip=” svg_div_bottom_invert=” svg_div_bottom_front=” svg_div_bottom_opacity=” svg_div_bottom_preview=” border=” border_style=’solid’ border_color=” radius=” column_boxshadow=” column_boxshadow_color=” column_boxshadow_width=’10’ background=’bg_color’ background_color=” background_gradient_direction=’vertical’ background_gradient_color1=’#000000′ background_gradient_color2=’#ffffff’ background_gradient_color3=” src=” background_position=’top left’ background_repeat=’no-repeat’ highlight=” highlight_size=” animation=” link=” linktarget=” link_hover=” title_attr=” alt_attr=” mobile_display=” mobile_col_pos=’0′ id=” custom_class=” template_class=” aria_label=” av_uid=’av-8k9msz’ sc_version=’1.0′]
[av_image src=’https://jylmachine.com/wp-content/uploads/2022/05/Automatic-Velcro-Tape-Sewing-Machine-300×300.jpg’ attachment=’1042′ attachment_size=’medium’ copyright=” caption=” image_size=” styling=” align=’center’ font_size=” overlay_opacity=’0.4′ overlay_color=’#000000′ overlay_text_color=’#ffffff’ animation=’no-animation’ hover=” appearance=” link=’manually,https://jylmachine.com/product/automatic-velcro-tape-sewing-machine/’ target=’_blank’ title_attr=” alt_attr=” img_scrset=” lazy_loading=’disabled’ id=” custom_class=” template_class=” av_element_hidden_in_editor=’0′ av_uid=’av-l3wsm97e’ sc_version=’1.0′ admin_preview_bg=”][/av_image]
[av_textblock textblock_styling_align=” textblock_styling=” textblock_styling_gap=” textblock_styling_mobile=” size=” av-medium-font-size=” av-small-font-size=” av-mini-font-size=” font_color=” color=” id=” custom_class=” template_class=” element_template=” one_element_template=” av_uid=’av-l3wro8vu’ sc_version=’1.0′ admin_preview_bg=”]
9. Attaching and fixing the cloth snaps (button):
The final step is the addition of the cloth snaps at the top of the center position of the cap where all the panel seams converge.
[/av_textblock]
[/av_one_full][av_one_full first min_height=” vertical_alignment=’av-align-top’ space=” row_boxshadow=” row_boxshadow_color=” row_boxshadow_width=’10’ custom_margin=” margin=’0px’ mobile_breaking=” mobile_column_order=” min_col_height=” padding=” svg_div_top=” svg_div_top_color=’#333333′ svg_div_top_width=’100′ svg_div_top_height=’50’ svg_div_top_max_height=’none’ svg_div_top_flip=” svg_div_top_invert=” svg_div_top_front=” svg_div_top_opacity=” svg_div_top_preview=” svg_div_bottom=” svg_div_bottom_color=’#333333′ svg_div_bottom_width=’100′ svg_div_bottom_height=’50’ svg_div_bottom_max_height=’none’ svg_div_bottom_flip=” svg_div_bottom_invert=” svg_div_bottom_front=” svg_div_bottom_opacity=” svg_div_bottom_preview=” border=” border_style=’solid’ border_color=” radius=” column_boxshadow=” column_boxshadow_color=” column_boxshadow_width=’10’ background=’bg_color’ background_color=” background_gradient_direction=’vertical’ background_gradient_color1=’#000000′ background_gradient_color2=’#ffffff’ background_gradient_color3=” src=” background_position=’top left’ background_repeat=’no-repeat’ highlight=” highlight_size=” animation=” link=” linktarget=” link_hover=” title_attr=” alt_attr=” mobile_display=” mobile_col_pos=’0′ id=” custom_class=” template_class=” aria_label=” av_uid=’av-7uqkdv’ sc_version=’1.0′]
[av_image src=’https://jylmachine.com/wp-content/uploads/2022/06/JYL-M2010-PQ-Adjustable-Buckle-Fixing-Machine-排扣机-5-300×267.jpg’ attachment=’1227′ attachment_size=’medium’ copyright=” caption=” image_size=” styling=” align=’center’ font_size=” overlay_opacity=’0.4′ overlay_color=’#000000′ overlay_text_color=’#ffffff’ animation=’no-animation’ hover=” appearance=” link=” target=” title_attr=” alt_attr=” img_scrset=” lazy_loading=’disabled’ id=” custom_class=” template_class=” av_element_hidden_in_editor=’0′ av_uid=’av-l3wsksgc’ sc_version=’1.0′ admin_preview_bg=”][/av_image]
[av_textblock textblock_styling_align=” textblock_styling=” textblock_styling_gap=” textblock_styling_mobile=” size=” av-medium-font-size=” av-small-font-size=” av-mini-font-size=” font_color=” color=” id=” custom_class=” template_class=” element_template=” one_element_template=” av_uid=’av-6bebpf’ sc_version=’1.0′ admin_preview_bg=”]
10. Attaching Closure:
attaching an adjustable closure at the back of the cap, which is used for adjusting the size for fit the head. The cap closure can be made of soft fabric or plastic material.
[/av_textblock]
[/av_one_full][av_one_full first min_height=” vertical_alignment=’av-align-top’ space=” row_boxshadow=” row_boxshadow_color=” row_boxshadow_width=’10’ custom_margin=” margin=’0px’ mobile_breaking=” mobile_column_order=” min_col_height=” padding=” svg_div_top=” svg_div_top_color=’#333333′ svg_div_top_width=’100′ svg_div_top_height=’50’ svg_div_top_max_height=’none’ svg_div_top_flip=” svg_div_top_invert=” svg_div_top_front=” svg_div_top_opacity=” svg_div_top_preview=” svg_div_bottom=” svg_div_bottom_color=’#333333′ svg_div_bottom_width=’100′ svg_div_bottom_height=’50’ svg_div_bottom_max_height=’none’ svg_div_bottom_flip=” svg_div_bottom_invert=” svg_div_bottom_front=” svg_div_bottom_opacity=” svg_div_bottom_preview=” border=” border_style=’solid’ border_color=” radius=” column_boxshadow=” column_boxshadow_color=” column_boxshadow_width=’10’ background=’bg_color’ background_color=” background_gradient_direction=’vertical’ background_gradient_color1=’#000000′ background_gradient_color2=’#ffffff’ background_gradient_color3=” src=” background_position=’top left’ background_repeat=’no-repeat’ highlight=” highlight_size=” animation=” link=” linktarget=” link_hover=” title_attr=” alt_attr=” mobile_display=” mobile_col_pos=’0′ id=” custom_class=” template_class=” aria_label=” av_uid=’av-46ez6r’ sc_version=’1.0′]
[av_image src=’https://jylmachine.com/wp-content/uploads/2022/05/JYL-IC002-CAP-ironing-machine-3-300×225.jpg’ attachment=’994′ attachment_size=’medium’ copyright=” caption=” image_size=” styling=” align=’center’ font_size=” overlay_opacity=’0.4′ overlay_color=’#000000′ overlay_text_color=’#ffffff’ animation=’no-animation’ hover=” appearance=” link=” target=” title_attr=” alt_attr=” img_scrset=” lazy_loading=’disabled’ id=” custom_class=” template_class=” av_element_hidden_in_editor=’0′ av_uid=’av-l3wsjup0′ sc_version=’1.0′ admin_preview_bg=”][/av_image]
[av_textblock textblock_styling_align=” textblock_styling=” textblock_styling_gap=” textblock_styling_mobile=” size=” av-medium-font-size=” av-small-font-size=” av-mini-font-size=” font_color=” color=” id=” custom_class=” template_class=” element_template=” one_element_template=” av_uid=’av-l3wroilq’ sc_version=’1.0′ admin_preview_bg=”]
11. Steaming the stitched cap:
After completing the stitching progress, the caps will be placed on a water steam blocking machine. The ironing machine will steams and fixing the shape of the cap. This is in order to avoid losing their shape of the hat in a short days, and longer the time of the shape of cap.
[/av_textblock]
[/av_one_full][av_one_full first min_height=” vertical_alignment=’av-align-top’ space=” row_boxshadow=” row_boxshadow_color=” row_boxshadow_width=’10’ custom_margin=” margin=’0px’ mobile_breaking=” mobile_column_order=” min_col_height=” padding=” svg_div_top=” svg_div_top_color=’#333333′ svg_div_top_width=’100′ svg_div_top_height=’50’ svg_div_top_max_height=’none’ svg_div_top_flip=” svg_div_top_invert=” svg_div_top_front=” svg_div_top_opacity=” svg_div_top_preview=” svg_div_bottom=” svg_div_bottom_color=’#333333′ svg_div_bottom_width=’100′ svg_div_bottom_height=’50’ svg_div_bottom_max_height=’none’ svg_div_bottom_flip=” svg_div_bottom_invert=” svg_div_bottom_front=” svg_div_bottom_opacity=” svg_div_bottom_preview=” border=” border_style=’solid’ border_color=” radius=” column_boxshadow=” column_boxshadow_color=” column_boxshadow_width=’10’ background=’bg_color’ background_color=” background_gradient_direction=’vertical’ background_gradient_color1=’#000000′ background_gradient_color2=’#ffffff’ background_gradient_color3=” src=” background_position=’top left’ background_repeat=’no-repeat’ highlight=” highlight_size=” animation=” link=” linktarget=” link_hover=” title_attr=” alt_attr=” mobile_display=” mobile_col_pos=’0′ id=” custom_class=” template_class=” aria_label=” av_uid=’av-2b5mz7′ sc_version=’1.0′]
[av_image src=’https://jylmachine.com/wp-content/uploads/2022/05/5215-1-300×123.jpg’ attachment=’977′ attachment_size=’medium’ copyright=” caption=” image_size=’entry_without_sidebar’ styling=” align=’center’ font_size=” overlay_opacity=’0.4′ overlay_color=’#000000′ overlay_text_color=’#ffffff’ animation=’no-animation’ hover=” appearance=” link=” target=” title_attr=” alt_attr=” img_scrset=” lazy_loading=’disabled’ id=” custom_class=” template_class=” av_element_hidden_in_editor=’0′ av_uid=’av-l3wsjbc1′ sc_version=’1.0′ admin_preview_bg=”][/av_image]
[av_textblock textblock_styling_align=” textblock_styling=” textblock_styling_gap=” textblock_styling_mobile=” size=” av-medium-font-size=” av-small-font-size=” av-mini-font-size=” font_color=” color=” id=” custom_class=” template_class=” av_uid=’av-l3wrp8fu’ sc_version=’1.0′ admin_preview_bg=”]
For most of the operations, stitching can be completed with simple sewing machines. But refer to the baseball cap visor and sweatband attachment, JYL automatic curve trim sewing machine will be advantage with it’s round bed for sewing the curved baseball cap visor. When the technology of the industrial Automatic machine is developing days and days, the producing progress will be simplified. It can help the hat manufacture to save a lot of labor cost, production time and material waste.
[/av_textblock]
[/av_one_full]